


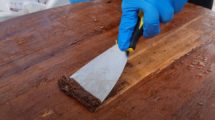

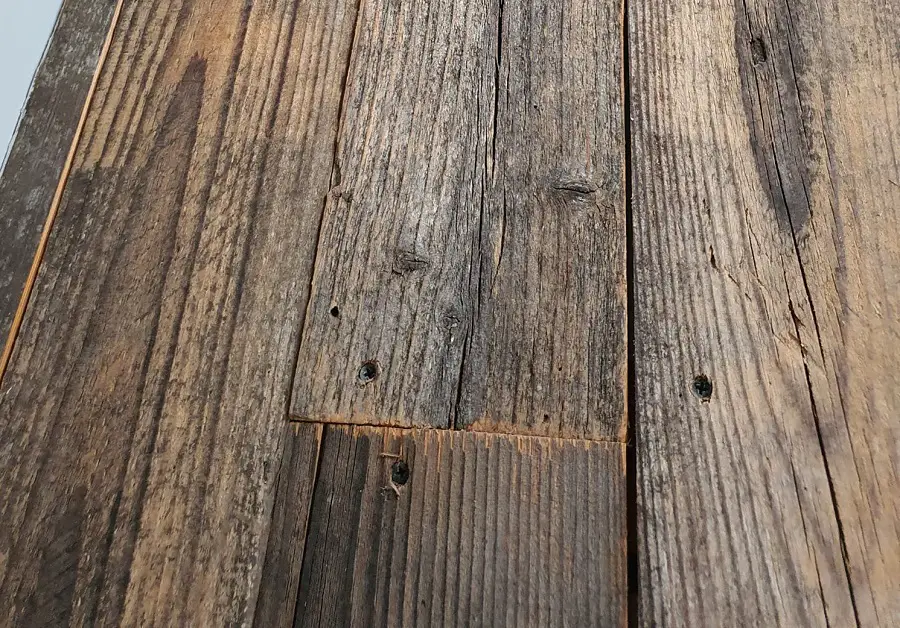
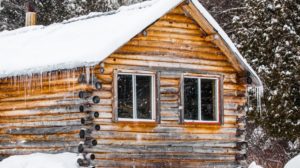
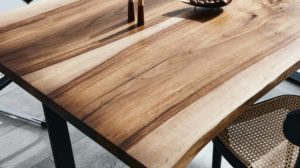
Acum ceva vreme am văzut fotografia de mai jos pe un grup de profil. Cel care o postase voia să știe dacă lemnul era vechi cu adevărat sau dacă fusese îmbătrânit artificial și ce ar trebui să facă, în cazul ultimei variante, pentru a ajunge la acel efect. Cum acest domeniu este una dintre pasiunile mele, am răspuns spunându-i care cred eu că ar fi etapele unui asemenea proces. Am rămas multă vreme cu imaginea lemnului vechi în minte încercând să găsesc soluții pentru ca rezultatul să fie și mai aproape de fotografia prezentată.
Nu știu cât de interesant este pentru voi, dar mie mi se pare fascinant cum, în piesele de teatru sau în filme, scenografii reușesc să creeze decoruri foarte credibile, chiar dacă evenimentele din piesă sau film se petrec cu 200-300 de ani în urmă. Înclin să cred că sunt și alții cu aceeași pasiune, așa că aveți mai jos răspunsul, completat cu indicații mai detaliate privind execuția.
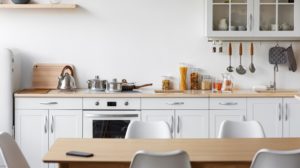
Pregătirea lemnului în alb
Se pornește de la scândură de lemn de rășinos, așa cum este și cel din fotografie. Înainte de aplicarea oricărui material, lemnul trebuie pregătit în alb. Este șlefuit cu hârtie abrazivă 100 și 120, fără să se insiste dacă sunt defecte de la tăiere (urme ale utilajelor). În fotografie se vede că aceste urme există.
Se perie apoi scândurile în lungul fibrei, cu peria cu sârmă fină, pentru a obține un desen în relief, așa cum se întâmplă în mod natural cu lemnul de brad care stă afară. Ploile, praful fin din vânt îndepărtează lemnul timpuriu, iar cel târziu rămâne în relief, obținându-se un desen 3D. Același aspect trebuie obținut cu peria, fără a rămâne urme clare de la perii de sârmă și fără ca efectul să fie foarte accentuat. Dacă rămân zgârieturi fine, se îndepărtează prin șlefuire.
Apoi se fac urmele trecerii timpului. Este lovit cu săculețul cu piulițe, se bat cuie (dacă sunt ruginite este și mai bine) și apoi se smulg, se zgârie cu cuiul în diverse direcții, este frecat cu rașpelul. Mai multe despre acest mod de a îmbătrânii lemnul găsiți și here. Rezultatul trebuie să fie cât mai natural și modul în care se face pregătirea ține de ”ochi” și ”simț”. Trebuie păstrat foarte bine echilibrul pentru că și prea mult și prea puțin poate duce la pierderea naturalului.
Baițurile și patinele vor crea efectul de vechi
Se aplică mai întâi un baiț gri albăstrui pe toată suprafața. Nu se aplică baiț negru deoarece va face un contrast prea mare și nenatural cu lemnul. Se folosesc baițuri gri cu nuanță de albăstrui pentru că este modul în care îmbătrânește natural lemnul neprotejat aflat la exterior. După uscare, se șlefuiește baițul diferențiat astfel încât să fie îndepărtat în unele locuri în totalitate, în altele parțial ș în altele deloc.
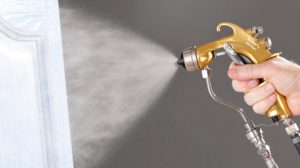
Pentru a obține efectul de murdărire trebuie aplicate patine peste baițul șlefuit. Ele pot fi aplicate direct sau după ce se aplică un strat fin de lac peste baiț. Este mai bine să o faceți cu un strat de lac pentru că efectele sunt mai ușor de controlat. Recomandat este un strat foarte subțire de lac acrilic pe solvent pentru că nu schimbă culoarea.
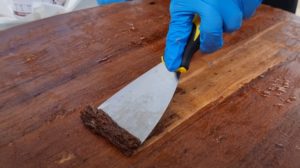
După uscarea și șlefuirea ușoară a lacului se aplică o patină nuc închis care se șlefuiește, după uscare, aproape total. Efectul va fi de murdărire a întregii suprafețe. Pentru șlefuire se folosește lână de oțel.
Pe unele scânduri se poate veni peste și cu o patină gri antracit care se șlefuiește și ea, lăsând doar un ușor efect de înnegrire. Despre patine și ce efecte se pot obține folosindu-le, aflați here.
La final se aplică un strat subțire de lac acrilic pentru a proteja efectul. Cele 2 straturi de lac trebuie să fie foarte subțiri și cu gradul de luciu foarte scăzut. Aceste lacuri se mai numesc și cu natural effect pentru că protejează lemnul fără a da senzația că este acoperit. Dacă patinele nu sunt protejate cu lac sau ceară se pot lua pe mână. Ceara și uleiul vor da un efect mai natural, dar sunt mai greu de aplicat astfel încât efectul să fie controlat.
The wood in the photo
Părerea mea este că cel din fotografie este lemn îmbătrânit natural. Spun asta pentru că pare a fi afânat dacă privești capetele scândurilor sau muchiile. O altă parte a întrebării se referea la cum ar trebui protejat un astfel de lemn învechit natural. Am sugerat tratarea cu apă de sticlă (silicat de sodiu) pentru a-l întări. Este o metodă folosită de restauratorii caselor vechi. Folosirea silicatului de sodiu are dublu avantaj fiind și un bun tratament de protecție împotriva carilor. Silicatul se absoarbe în lemn fără a crea peliculă.
Pentru protecție superficială cred că un strat de ulei și unul de ceară vor fi suficiente. Ceara, pe lângă tușeul plăcut, va asigura și o protecție mai bună în timp.
Cu siguranță, nu este singura metodă
Nu este singurul mod prin care se poate ajunge la același rezultat. Există mai multe modalități, important este ca efectul să fie cât mai natural. Doar 2 exemple:
- arderea superficială a lemnului, periere până la îndepărtarea aproape totală a lemnului carbonizat, patinare, uleiere;
- tratarea lemnului cu o soluție obținută din șpan metalic ținut în oțet (găsiți here metoda). Eu am încercat pe lemn de brad, dar efectul nu a fost foarte spectaculos. Cred că ar mai trebui ajutat cu patine pentru a obține un efect asemănător celui din fotografie. Pe lemn de stejar dă mult mai bine pentru că reacționează cu taninii din lemn. La final, ulei și ceară.
Sper să vă fi trezit interesul de a obține lemn sau mobilier învechit astfel încât să pară de pe vremea bunicii. Eu am finisat antichizat piese de mobilier și satisfacția de a vedea mobila ducându-se înapoi în timp sub mâinile tale este extraordinară. Dacă aveți și alte idei privind lemnul despre care am vorbit sau sunt întrebări, neclarități, lăsați-le mai jos, în spațiul dedicat. Vă voi răspunde cu siguranță.


Add comment