


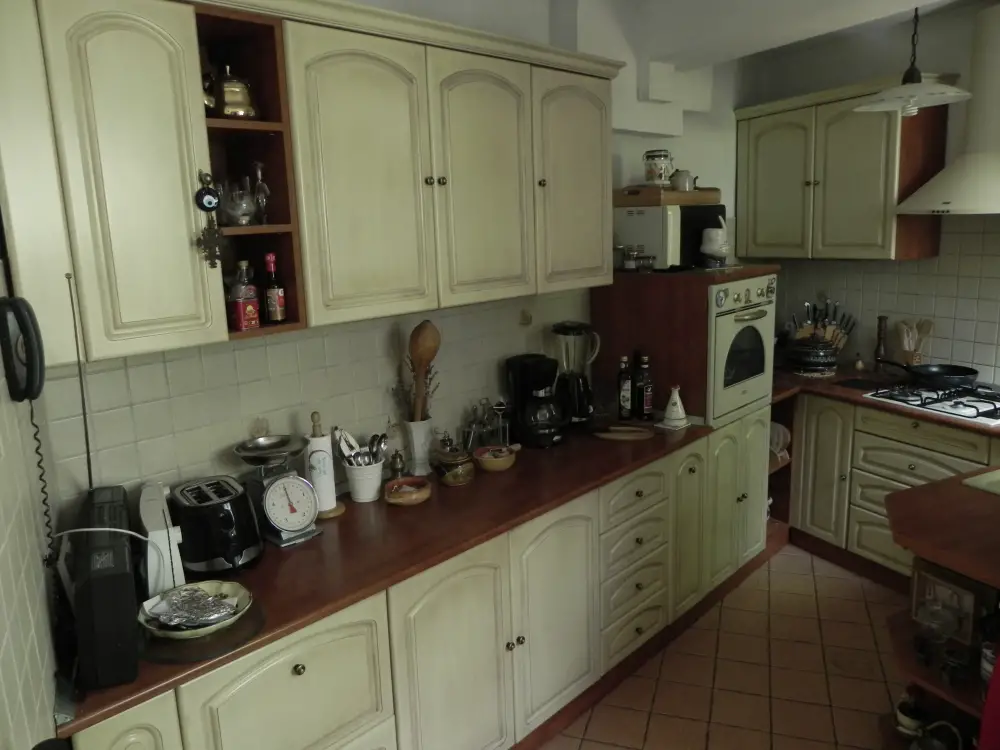
I thought I'd tell you today about my kitchen. It's not new, it's already more than 8 years old, but because I did the finishing myself, in a factory I was working with at the time, I want to share my experience with you. Unfortunately I don't have any photos of the finishing because I didn't think I would make my kitchen a star on the net ☺. But you can see what it looks like now.
Combination of chipboard and painted and antiqued chipboard
As I was saying, years ago I made my kitchen furniture. Although I've always loved wood, at that time, for economic reasons, I chose to make the doors (fronts) in MDFand the casing is made of chipboard. I live in an old house and the kitchen space is a bit of an odd shape. That's why I called an architect friend of mine to design the kitchen furniture so that I can make the most of the space.
With the project in hand, I went to a company I had worked with on other projects and asked them to do my kitchen, but not to finish the doors, because I want to do that myself. Let me know only when the doors are done. After some time they told me that they had sorted out the doors and in order to finalize the kitchen as soon as possible, I should take care of finishing them.
I picked them up and took them to a factory to which I supplied the finishing materials and which made bathroom and kitchen furniture from MDF. The people were very nice and said they would make them for me, but I asked them to let me make them. They didn't mind and told the people at the station to help me if they needed to.
Stages of finishing MDF fronts
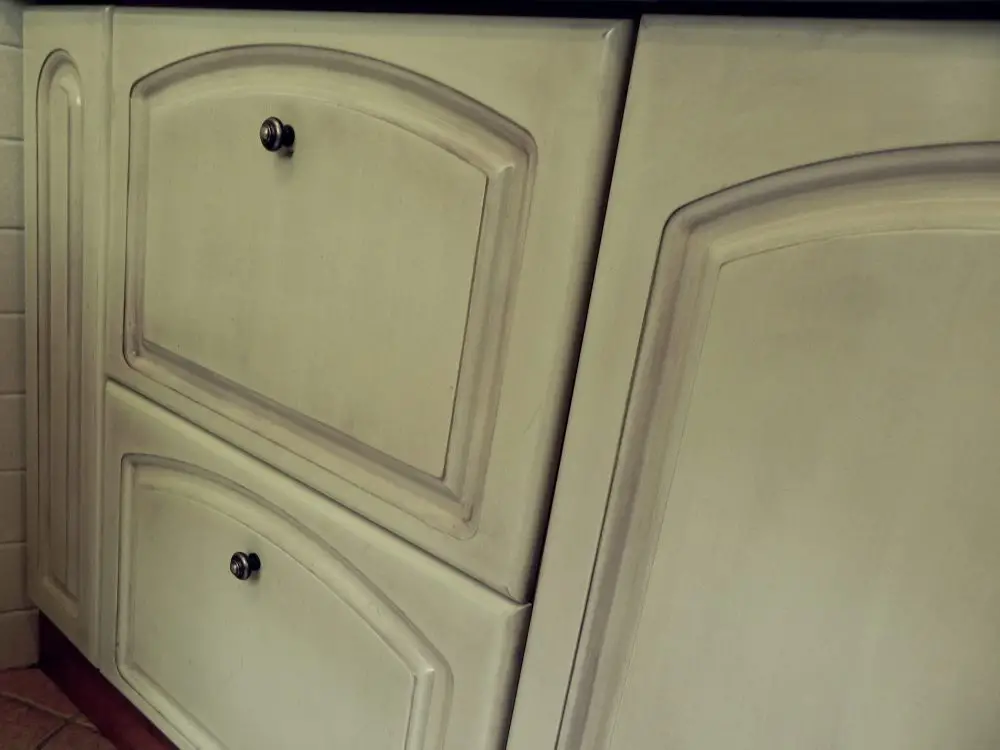
We started by sanding all the milled areas well, including the edges. After sanding and sanding, I applied a coat of polyurethane sealer. Using the insulator is very useful when finishing MDF because it reduces primer absorption in the milled areas and locks in any tannins or dyes in the MDF board that can affect the finish.
After the insulator we applied ud on udAt 45-50 minute intervals, the colored polyurethane primer. If I let the insulator dry completely, it was mandatory to sand it before applying the primer, in order to avoid adhesion problems. The primer was cream, in tone with the tiles, a color that I made from transparent base and pigment pastes.
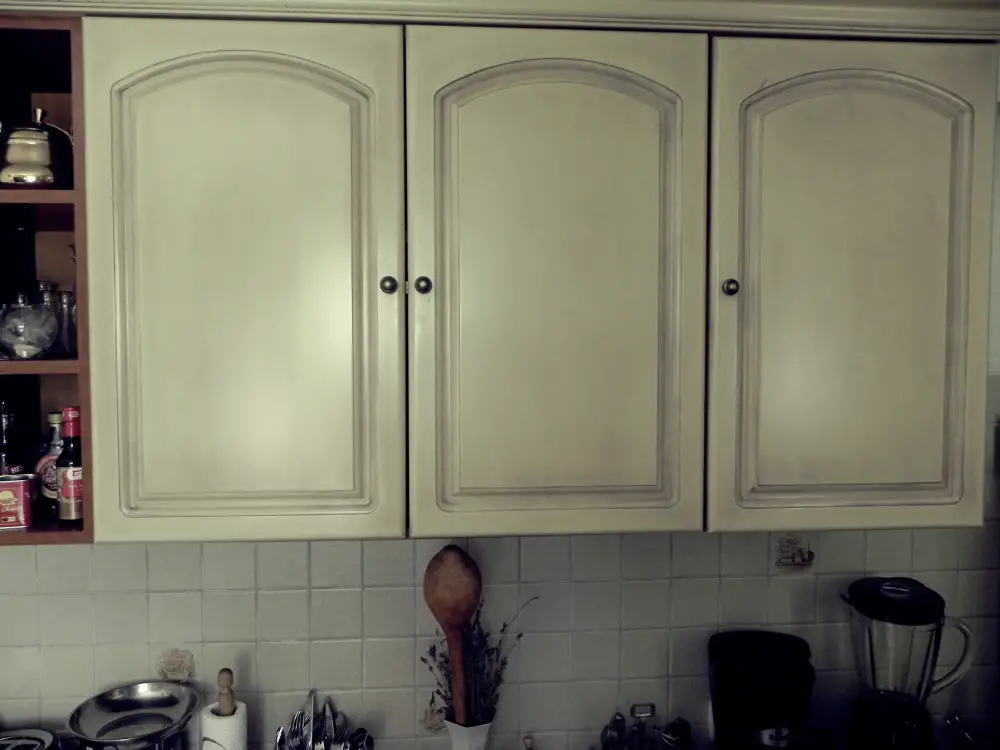
I allowed the primer to dry overnight, and the next morning I sanded well between coats with 320 sandpaper. Immediately after sanding I applied, all over, the red walnut patina. This is where I made a mistake and had to work harder. But as the saying goes, man learns from his mistakes.
Sanding, I removed the hard topcoat and got to the area where the reaction was not finished and the primer was softer. The patina that was applied right away had a very tight grip on the substrate and I had to put a lot more effort to remove it. I remember sanding the patina on each door by myself and the ladies there came over and asked if I didn't want their help. I begged them to let me do it all myself, telling them that if I didn't like the result I would know it was all my fault.
Fortunately, in the end the doors turned out as I wanted. The patina gave the doors an aged look and emphasized the milling. In addition, I learned that to more easily remove the patina from the polyurethane primer, the surface should not be sanded beforehand. It was fine to sand in the evening and apply the patina in the morning. Sanding the patina over the entire surface of the doors also created the roughness needed for the next coat to adhere.
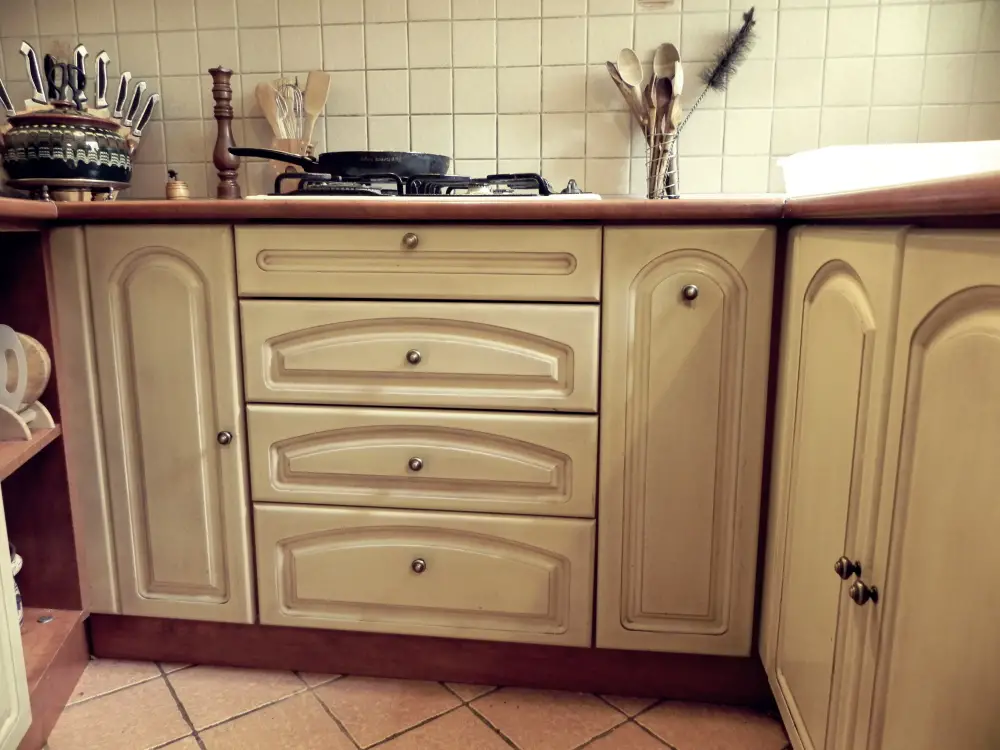
At the end we applied a coat of transparent polyurethane varnish with gloss level 30.
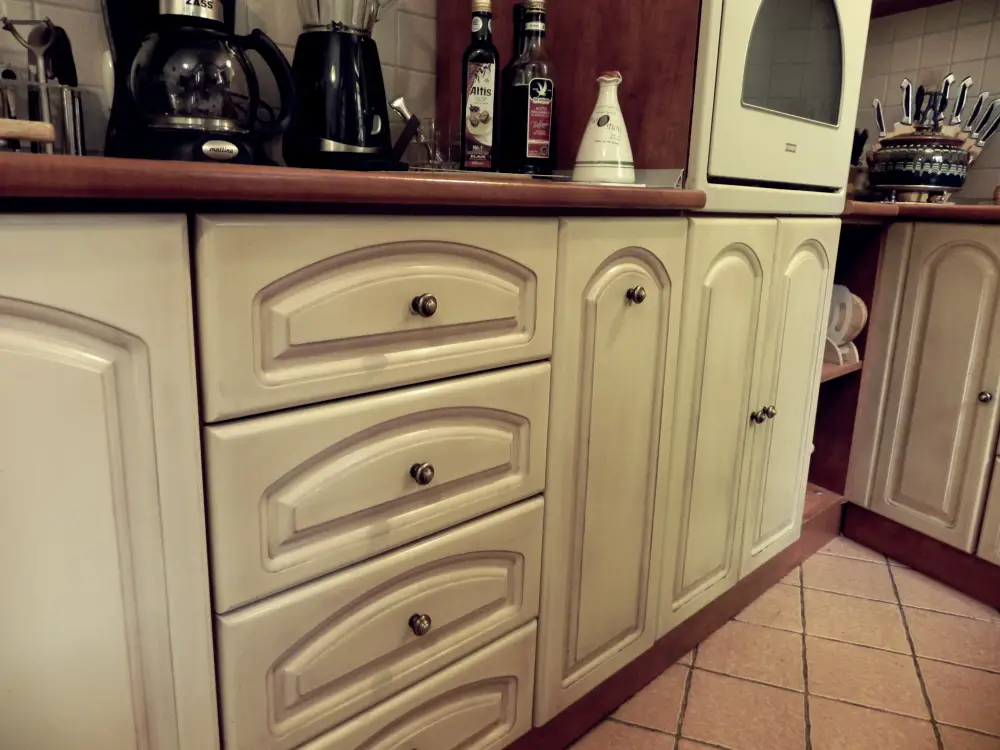
Everything turned out very well and I was very happy with the result. I still am, even if I wish the furniture was wood. Interestingly, everyone who walked into my kitchen actually thought it was wood under that finish. What do you think? Don't patronize me, I take criticism pretty well. ☺


Success!
Especially considering that a few years ago few people dared to even try something like this.
Thank you!
Very nice and useful article. I am renovating my whole house and now I have chosen for the bathroom rustic stone look tiles, but the shower mask is glossy white MDF. I'll have some work to do, but I'll definitely 'steal' the idea, especially as I've salvaged old lamps and wrought iron bars that I'll use as towel racks and pegs. My house is old, from around 1920, I'm the third generation to live there, and I've decided that something modern doesn't suit it.
I understand what you are saying because I live in an old house too. You can turn glossy furniture into a matte one by applying a coat of clear matte lacquer. First you have to sand the surface with fine abrasive sponges (sandpaper 240-320). It will be a little harder because the lacquer sands harder because it is scratch resistant. But otherwise the new layer won't stick to the old one. When you buy the varnish, ask how glossy it is. It should be from 30-35 down. To give you an idea, in the 3rd photo in the article you can see a little that the varnish does not shine but reflects a little light. This is gloss level 30. Good luck.
Very successful work! Congratulations, Mrs Radu!
I've been reading your articles for some time now because I like working with wood, as a hobby of course. I have managed to recondition a few pieces but I am now facing a problem that you seem to clarify in the comment above.
However, I still have some concerns. I have a piece of furniture inherited from my parents, a dining room from the 80s, "Drobeta" it was called, shiny. I understand that I can take the shine with a matt varnish, but how can I change the colour? What would the technology be?
Thank you and good luck in what you are undertaking.
Thank you!
If it is furniture from the 80s the finish was done with polyester varnish or nitrocellulose varnish. To change the gloss will not be a problem. Simply wash it with a cloth, water and detergent, wipe it well and sand the surface lightly with 280-320 grit sandpaper or fine abrasive sponges (for adhesion, if it was made with polyester varnish). Wipe off the sanding dust and apply nitrocellulose varnish with the desired gloss.
To change its colour is more complicated. You can apply coloured nitrocellulose varnish, but the appearance will be similar to plastic. If you don't want this, you have to remove the varnish with a paint stripper (available in DIY stores). Apply the paint stripper with a brush to the entire surface, wait a little and then remove it with a scraper. Then sand and apply a coat of thinned varnish in which you put the desired colour. It is better to use varnish to avoid stains (there is a risk that varnish remains after stripping). After drying this coat, apply 2-3 coats of colourless nitro varnish with the desired gloss level. As I told you it is more complicated but this way you will highlight the natural design of the wood and the furniture will not look like plastic.
Good luck!
Hello!
I would like to change the colour of the living room furniture which is pale wenge to white.
I'm afraid that if I paint the palms directly with a water-based paint, at the slightest touch, it will jump off.
Can you give me some advice, please?
Thank you very much.
Good evening,
In order not to skip you must degrease the surface. Wash thoroughly with water and detergent, then wipe dry. You can also clean with a cloth with thinner to make sure that all traces of grease have been removed.
If you want to use chalky paints, I understand Annie Sloan's are good for chipboard too. They are fixed at the end with clear or coloured wax (if you want a patina look).
Good luck!
Hello
I am impressed by your "work"! I would like something like that! Do you know a company/producer for this?
Thank you!
Hello!
Thank you too!
Now there are companies making such furniture all over the country. It is best to work with someone in your area to come to your home for measurements and installation. There are manufacturers who also have showrooms where you can see models, configure your kitchen and choose the colour and design of the fronts (furniture doors).
All the best!
Hello Mrs Radu,
I just read your article, which is exactly what I want to do.
After 10 years of moving into the house I manage to change my kitchen furniture.
The fronts will be painted mdf, from Nett Front, colour Nett 05 - it's a cream/ochre. I haven't been able to get them to give me that antique patina and I haven't been able to get them to give me the other painted mdf manufacturer, Global, from Suceava. So I decided that after the assembly, I would take care of the patina/antiquing of the furniture myself.
What I want to ask you is to tell me what would be the steps I need to do and their order and what materials I need to buy. I would like something similar to your furniture to come out.
Thank you in advance, George Mateescu
Good evening!
I made those doors in a furniture factory, with the right materials and equipment at hand. Over the primer I applied the patina in a thin layer with a gun, let it dry, then sanded it with steel wool. At the end I applied the protective varnish.
In your case it will be more difficult, because you will have to apply the patina without pitol. The easiest way is to use coloured wax which you apply all over, leave for 15-20 min, then wipe off the excess. Insist where it seems that there is too much left. Let it dry until the next day, then apply the colourless wax. Apply with a rag in a thin layer. After 5-6 hours, you can polish the surface. The disadvantage of this method is that the wax has low resistance to temperature, aggressive cleaning, patari, alcohol. Being kitchen furniture, you will have to be more careful with it.
Another possibility is to use spongeable or ragable patinas, which are low-adhesion staining solutions so that they can be easily removed by wiping. After wiping or sanding apply varnish to protect the effect. You can find such coatings at distributors of professional wood finishing products.
From what you write I understand that you will skate the doors already painted. The above indications are for this version,
If starting from milled MDF doors, you should sand the milled areas with medium abrasive sponge or 180-220 grit sandpaper, sand and apply a coat of primer. To resemble my furniture you will need dark cream primer. The colour will darken from the patina. After drying the first coat, sand with fine abrasive sponge or sandpaper 280-320 grit and apply the second coat of primer. If after drying, the surface does not look very smooth, sand again. Do not apply patina immediately after sanding because it will have more adhesion to the surface and will be difficult to remove. Leave until the next day. Then continue as above.
Good luck!
Good evening, thank you very much for your answer and advice.
Fortunately I'll just have to do what you wrote in the first part of the post with the MDF doors already painted. I'll go for the patina version applicable with a sponge or rag.
I only dare to ask you to recommend me a distributor of professional wood finishing products who has a shop in Bucharest.
Thanks again and have a nice evening.
You can go to Colormix (colormix.ro), in Jilava, where you can find Sirca products or to Lomilux Bucharest, Theodor Pallady Boulevard, nr.66, distributor of ICA products. You can also find there people who can guide you.
All the best!