


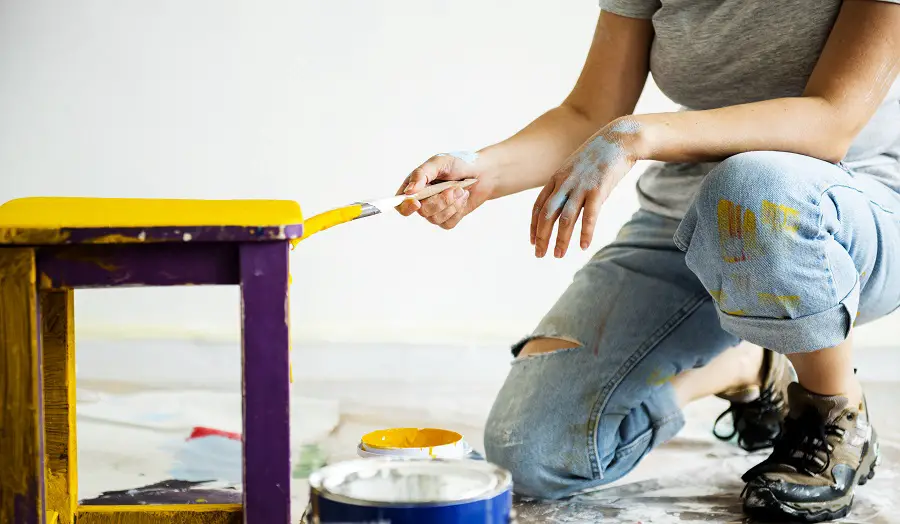
Sunt zile în care trebuie să stăm în casă și avem nevoie de activități pentru ca timpul să treacă mai repede și mai ușor. Cei pasionați de bricolaj pot face carantina mai suportabilă transformând obiecte vechi de mobilier, împrospătând vopseaua ușilor sau ferestrelor, vopsind rame sau alte obiecte din lemn. Iar cei care au ateliere de tâmplărie au prilejul să învețe mai multe despre finisare.
Am scris aici și aici despre problemele care pot apărea când finisați suprafețele cu ceară sau ulei. M-am gândit că un articol care să grupeze problemele ce pot apărea la aplicarea vopselei sau a lacului și cum pot fi ele rezolvate v-ar putea fi de folos. Mai ales că multe dintre întrebările primite de la voi sunt legate de acest subiect.
Pregătirea suprafețelor înainte de revopsire
Înainte însă, câteva sfaturi legate de pregătirea obiectelor înainte de a fi revopsite. Un obiect vechi adună de-a lungul timpului praf și grăsimi care se depun pe suprafață. Dacă vrem ca suprafața să arate bine la final iar vopseaua să nu se desprindă la cea mai mică atingere, înainte de a aplica stratul nou de vopsea obiectele trebuie curățate.
Nu vă speriați, nu este nimic complicat. Curățarea se face cu apă și resturi de săpun sau detergent de vase. Recomand aceste produse pentru ca sunt foarte eficiente în îndepărtarea grasimii. Se face o soluție nu foarte concentrată și cu ajutorul unei cârpe moi (cele mai bune sunt tricourile vechi de bumbac) se spală suprafețele. ATENȚIE, apa nu trebuie să băltească. Carpa se stoarce înainte de a șterge obiectele. Apa în exces poate pătrunde în profunzime și dezlipi părți de mobilier sau furnirul.
După ce ați șters bine toate suprafețele, insistând acolo unde murdaria cedează mai greu, ștergeți totul cu apă curată, tot cu o carpă moale stoarsă bine. La final ștergeți din nou cu o cârpă uscată și lăsați să se zvânte câteva ore înainte de a aplica stratul nou de vopsea sau lac.
În cazul mobilierului este obligatorie degresarea. Produsele de îngrijire a mobilei care se găsesc în comerț conțin o cantitate de ceară. Aceasta rămâne pe suprafață și pe lângă faptul că fixează praful, slăbește foarte mult aderența noului strat de vopsea.
Și nu, apa nu albește lacul de pe mobilă decât dacă este în exces și băltește (stă o perioadă îndelungată) pe suprafață.
Câteva dintre problemele ce pot apărea la lăcuire sau vopsire și cum pot fi rezolvate
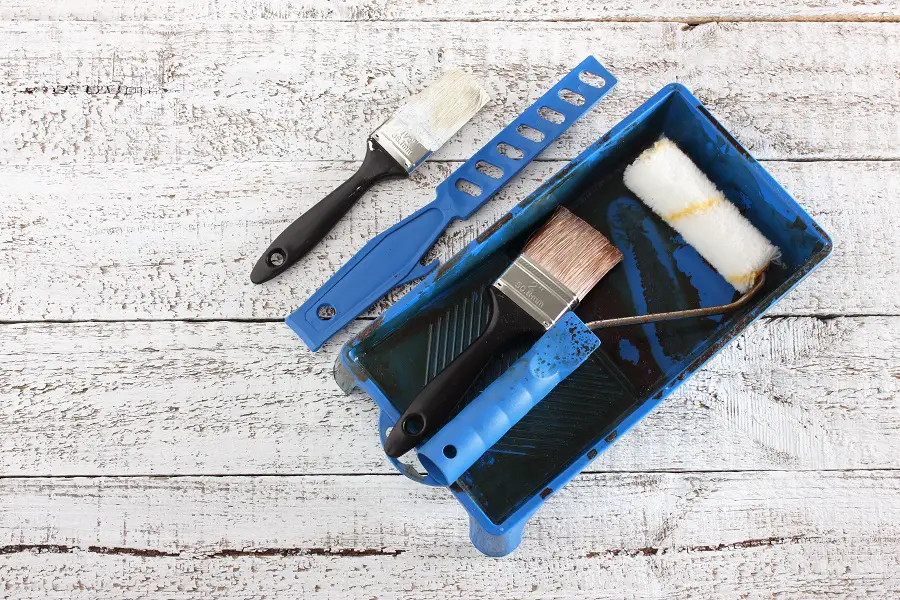
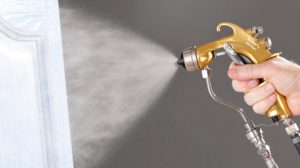
Să revenim la problemele care pot apărea când vopsiți sau lăcuiți. M-am limitat la cele apărute când vopselele se aplică cu pensula, trafaletul (rola) sau cu pistolul simplu de pulverizat (pistol cu cană).
1. Suprafață aspră
Pot fi mai multe cauze:
- pelicula a prins praf sau alte impurități din atmosferă,
- pelicula a înglobat aer,
- dacă aplicarea a fost făcută direct pe lemn, acesta nu a fost șlefuit corespunzător înainte
Praful este dușmanul peliculelor de lac sau vopsea, mai ales când sunt mai lucioase. Pentru a evita prinderea prafului în pelicula udă evitați să lucrați afară, în spațiu deschis și folosiți lacuri și vopsele care se usucă mai repede. Nu foarte repede însă (nu forțați uscarea cu surse de căldură gen suflante cu aer cald) pentru că atunci aerul din peliculă nu mai are timp să iasă și ajungeți la același rezultat. Aer în peliculă există întotdeauna, indiferent de metoda de aplicare, dar cel mai puțin ajunge dacă se folosește un trafalet cu burete dur.
În cazul în care aplicati vopsea direct pe lemn, acesta trebuie șlefuit înainte cu hârtie abrazivă cu granulația 180-220 sau cu bureți abrazivi medii, după care se desprăfuiește prin ștergere cu o cârpă umedă. Nu aplicați imediat vopseaua decât dacă este pe bază de apă. Mai multe despre șlefuirea lemnului (șlefuirea în alb) găsiți aici.
Pentru a obtine o suprafață fină și plăcută la atingere va trebui să șlefuiți foarte bine suprafața aspră cu un burete abraziv fin sau cu hârtie abrazivă cu granulația 280-320 (sau 400, dacă lacul sau vopseaua sunt foarte lucioase) până la îndepărtarea asperităților (se simte la mână), să desprăfuiți foarte bine cu cârpa, să lasați să se liniștească tot praful din atmosferă și să aplicați, cu atenție, un alt strat de lac sau vopsea. Aplicați straturi subțiri pentru că o peliculă groasă este mai puțin elastică și poate crăpa.
Daca obiectul pe care îl finisați este lucios, puteți îndepărta asperitățile de pe pelicula prin polișare. Cum se face polișarea găsiți aici. Nu se recomandă folosirea metodei pentru lacurile mate pentru că va crește gradul de luciu.
Daca aveți un spațiu special unde faceți vopsirea, puteți arunca cu apă pe jos (cum se face vara înainte de a mătura). Apa atrage praful și îl reține.
2. Aspect de coajă de portocală
După uscare, pelicula nu este perfect netedă, semănând foarte bine cu coaja de portocală. Este vizibil imediat după aplicarea lacului (cu atât mai vizibil cu cât este mai lucios), dar poate dispărea după uscare. Lacurile și vopselele sunt viscoase și au nevoie de timp să se așeze. Dacă acest timp este mai mic decât cel de uscare, pelicula finală nu va fi netedă. Viscozitatea se reglează cu ajutorul solvenților (apa sau solvenții organici). Dacă lacul sau vopseaua sunt groase ele trebuie diluate pentru a se așeza cât mai bine.
Coaja de portocală poate apărea și dacă lacul și obiectul sunt aduse dintr-un depozit neîncălzit și nu au fost lăsate să ajungă la o temperatură de peste 15°C. Dacă aplicarea se face cu pistolul, distanța dintre pistol și obiect, precum și presiunea aerului poate duce la apariția defectului. Distanța trebuie să fie de min.25 cm iar presiunea de 3-4 atm. Cei care aveți în atelier compresor pentru pistoalele cu capse, nu folosiți aceeași presiune și la aplicarea lacurilor. Pe lângă pelicula cu aspect de coajă de portocală veți avea și pierderi mari de lac.
Tot prin șlefuire și revopsire se rezolvă și această problemă. Șlefuirea trebuie făcută mai în profunzime, nu doar superficial, pentru a îndepărta toate denivelările din peliculă. După desprăfuire se aplică un strat subțire și diluat corespunzator de lac și nu se forțează uscarea.
3. Înțepături în peliculă
Defectul poate părea asemănător bulelor de aer rămase în peliculă, dar este diferit. Dacă priviți mai atent veți vedea niște înțepături fine ca de ac, grupate. Apar atunci când aplicarea lacurilor sau vopselelor se face prin pulverizare.
Sunt două cauze ale apariției defectului:
- apa acumulată în compresor care, din diverse motive, ajunge în pistol,
- pulverizarea produselor pe bază de apă și pe bază de solvent se face cu același pistol.
În primul caz, înțepăturile apar dacă lacul este pe bază de solvent. Umiditatea din atmosferă se acumulează în compresor sau pe furtune și ajunge în pistol unde este transformată în picături foarte mici și amestecată cu lacul. Cum apa și solventul nu se înțeleg, picăturile fine de apă ajung la suprafață și formează acele mici găuri sub formă unor înțepături. Problema se rezolvă punând filtre pe trasee, controlând și golind compresorul mai des, mai ales în perioadele cu umiditate mare.
În cel de al doilea caz înțepăturile apar tot pentru că apa și solventul nu se înțeleg. Dacă se pulverizează lac pe bază de solvent după lac pe bază de apă iar spălarea pistolului nu s-a făcut foarte bine, apar aceste înțepături. Este recomandat ca, dupa spălare, pistolul să fie clătit cu acetonă. Acetona este compatibilă, atât cu apa, cât și cu solventul.
Îndepărtarea înțepăturilor se face tot prin șlefuire energică și aplicarea unui nou strat de lac sau vopsea.
4. Cratere (ochi de pește) în peliculă
Se văd imediat ce se aplică lacul/vopseaua sau imediat după. Arată ca atunci când apa ajunge pe o suprafață grasă. De vină sunt urmele de grăsime, ulei sau ceară de pe suprafață pentru că nu a fost spălată și degresată corespunzător sau particulele de silicon din atmosferă . Substanțele grase pot fi pe măini sau pe cârpele cu care se face ștergerea suprafețelor. Particulele de silicon ajung pe suprafață din aer, acolo unde pot persista și câteva zile după ce a fost folosit la izolări sau fixarea ferestrelor (chiar și la o distanță mare de locul unde se face finisarea).
Din păcate, în acest caz trebuie îndepărtat prin șlefuire tot stratul, degresată foarte bine suprafața și reluat finisajul. Când este vorba despre silicon, există diluanți speciali care pot fi folosiți în amestec cu lacurile pe bază de solvenți pentru a-i contracara efectele.
5. Umbre (norișori albi) în peliculă
Apar atunci când uscarea a fost prea rapidă și solventul nu a avut timp să iasă în totalitate din pelicula. Este mult mai vizibilă la produsele pe bază de apă, dar poate apărea și la cele pe bază de solvent. Foarte importantă este și umiditatea din atmosferă. Când este ridicată, șansele albirii peliculei sunt mai mari. La produsele pe bază de apă este importantă și circulația aerului în timpul uscării. Dacă temperatura este ridicată și nu există curenți de aer, pelicula se usucă la suprafață (se închide) înainte să iasă toată apa.
Dacă nu este o cantitate mare de solvent în interior problema poate fi rezolvată încălzind ușor pelicula. Metoda este valabilă atât pentru produsele pe bază de apă cât și pentru cele pe bază de solvent, fără întăritor (lacuri nitrocelulozice).
La produsele pe bază de apă pentru exterior, defectul poate apărea și la câteva zile după ce s-a încheiat finisarea. De exemplu, dacă se aplică lac de exterior pe bază de apă pe tocurile ferestrelor și la câteva zile dupa aceea vine o perioadă ploioasă, lacul se poate albi chiar dacă picăturile de ploaie nu au ajuns pe suprafața finisată. Nu este ceva grav, pelicula va reveni la aspectul inițial odată cu apariția soarelui. Este un lucru firesc la lacurile pe bază de apă, care continuă sa aibă schimb de umiditate cu mediul încă 2-3 săptămâni după ce lacul a fost aplicat.
6. Pelicula se zgârie foarte ușor
Cand pelicula se zgârie cu foarte mare ușurință iar zgărietura este o dungă lată albicioasă nu este vorba de un lac care se zgârie ușor ci de aderență scăzută la stratul vechi de lac. Se întâmplă când se aplică lac pe bază de solvent peste un strat vechi de lac pe bază de apă sau unul lucios. Din cauza aderenței scăzute, când apare o acțiune mecanică (lovire, zgâriere), lacul se desprinde și sub el intră aer (de aici culoarea albă).
Dacă vreți să aplicați lac pe bază de solvent pe o suprafață mai veche și mai lucioasă, slefuiți după degresare. Este bine sa testați compatibilitatea materialelor înainte într-un loc mai ascuns. Dacă nu se separă imediat sau solventul nu atacă stratul inferior (arată de parcă ar înflori), sunt compatibile. Șlefuirea se face cu bureți abrazivi fini sau cu hârtie brazivă cu granulația 280 sau 320. Lacul se aplică după desprăfuire.

7. Crăpături în peliculă
Crăpăturile în peliculă pot apărea din cauza lacului/vopselei și a modului de aplicare sau din cauza mișcarii naturale a lemnului odată cu creșterea sau scăderea umidității din aer. În primul caz crăpăturile sunt neuniforme pe toată suprafața, în toate direcțiile, fără sa urmeze un anumit tipic. În cel de-al doilea caz, crăpăturile vor fi în lungul fibrei lemnului sau în lungul îmbinărilor.
Când vorbim de crăpături din cauza lacului și a modului de aplicare, cauzele pot fi stratul prea gros, aderența scăzută, lac casant din cauza unei cantități prea mari de întăritor, aplicare la temperatură prea scăzută, alegerea unui lac nepotrivit pentru modul de utilizare al obiectului, lac pe bază de apă care a înghețat. Pentru a remedia trebuie îndepărtat tot stratul de lac, prin șlefuire și refăcut totul folosind un lac potrivit și respectând instrucțiunile de aplicare.
Crăpăturile din cauza mișcării lemnului au drept cauza un lemn cu umiditate prea mare, prea mică sau uscat greșit (prea repede, la temperatură prea mare, fără a verifica și temperatura în interior nu doar cea de suprafață), elasticitatea scăzută a lacului sau a adezivului. Și în acest caz trebuie îndepărtat stratul de lac, controlată umiditatea lemnului (care trebuie să fie 8-12% și la interior, nu doar superficial) și aplicat un lac cu elasticitate mai mare.
Sper să vă fie utile aceste câteva explicații. Despre fiecare dintre defecte se poate vorbi mai mult, dar am ales să prezint ideile principale. Dacă vreți să aflați mai multe sau ați întâlnit și alte defecte de peliculă pe care vreți să le lămuriți, scrieți mai jos, în spațiul dedicat. Vă voi răspunde cu siguranță.
Rămâneți optimiști! Va trece și va fi bine!


Buna ziua… doresc sa reconditionez un tavan din lambriu lemn masiv vopsit cu lac ( tot cu lac vreu sa-l revopsesc). Lambriul este in bucatarie …. va rog sa-mi spuneti cum procedez!? Multumesc!
Buna ziua!
In functie de cat de afectat este vechiul strat de lac, aveti 2 posibilitati: indepartarea totala a vechiului strat de lac si revopsire sau aplicarea unui strat nou de lac peste cel vechi. In primul caz este mai dificil. Va trebui sa indepartati total lacul vechi prin slefuire sau decaprare, sa slefuiti bine lemnul curatat si se aplicati 2 straturi de lac pe baza de apa sau poliuretanic (cu intaritor). In al doilea caz va trebuiti sa spalati vechiulstrat pentru al degresa si curata, sa stergeti bine cu o carpa moale uscata si sa slefuiti usor supeafata pentru ca noul strat sa aiba aderenta. Aplicati lac pe baza de apa. Acesta este compatibil cu majoritatea lacurilor, dar pentru a avea aderenta trebuie sa slefuiti uros stratul vechi.
Mai multe informatii, in link-urile de mai jos.
Toate cele bune!
https://revistadinlemn.ro/2017/06/13/cum-sa-aduci-la-viata-cufarul-vechi-din-pod/
https://revistadinlemn.ro/2017/09/15/cum-se-curata-stratul-vechi-de-vopsea/
https://revistadinlemn.ro/2020/04/07/albirea-mobilei-din-cauza-dezifectantilor/
Buna seara! Pentru un tavan din lambriu de lemn rasinos este suficienta doar lacuire sau trebuie dat inainte si un strat de ulei de in? Ma puteti ajuta cu un tip de lac? Tavanul este in interior, 80mp, se poate lacui cu pistolul sau ar fi mai bine la pensula? Multumesc mult!
Bună ziua!
Este suficient doar ulei. Dacă soriți să-l acoperiți trebuie să folosiți doar lac alchidic pentru că altceva nu are aderență pe ulei.
Consider însă suficient uleiul pentru un lambriu de tavan. Vă recomand să aplicați însă 2-3 straturi de ulei, cu pauza de 24 se ore între aplicări și ștergerea surplusului la 30-60 minute după aplicare. Așa lemnul va absorbi cât este necesar și va fi foarte bine protejat.
Toate cele bune!
https://revistadinlemn.ro/2018/05/15/ulei-de-in-cand-unde-si-cum-se-foloseste-cum-sa-ti-faci-singur-vopsele-de-ulei/
https://revistadinlemn.ro/2019/04/17/7-reguli-de-respectat-la-finisarea-cu-ulei-a-lemnului/
Buna ziua,am o problema..sotia a aplicat pe scari un lac glazura usoara pe baza de rasina cred ca e,de la kober…peste lacul vechi si nu se mai usuca.Adica a ramas lipicios si lasa semne la atingere ,dar nu se ia pe deget etc.
Ce se intampla si cum as putea sa rezolv? Multumesc
Bună ziua!
Din ce spuneți, bănuiesc că este vorba de lazură pe bază de ulei sau alchidică care se folosește de obicei pentru lemnul care se află afară. Astfel de produse nu sunt recomandate pentru scări pentru că sunt mai elastice și mai moi. Sunt făcute special să nu crape când lemnul se modifică dimensională odată cu creșterea sau scăderea umidității exterioare. Cred că stratul a fost foarte gros, solventul nu a putut ieși și lacul nu s-a uscat, a rămas lipicios.
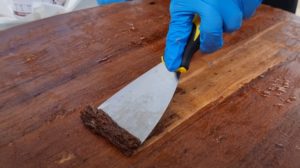
Din păcate, singura soluție este să îndepărtați totul, până la lemn, cu ajutorul unui decapant (paint remover) pe care îl găsiți în magazinele de bricolaj gen Dedeman. Modul cum se face decaparea este descris pe larg în link-ul de mai jos. După ce îndepărtați lacul lipicios înmuiat cu o racletă, ștergeți suprafața scărilor cu o cârpă cu diluant și lăsați să se usuce. Apoi aplicați lac special pentru parchet (pe bază de apă sau de solvent) pe care îl găsiți tot în astfel de magazine.
Am pus și un link în care explic de ce nu se folosesc produsele pentru exterior la protejarea parchetului și a scărilor.
Toate cele bune!
https://revistadinlemn.ro/2022/09/08/cum-sa-cureti-cu-decapant-straturile-vechi-de-vopsea/
https://revistadinlemn.ro/2023/06/21/de-ce-nu-se-foloseste-lac-de-exterior-pentru-protectia-parchetului-si-scarilor-interioare-din-lemn/