


Much of the furniture we have at home is veneered. Veneered furniture is more vulnerable than solid wood when it comes to moisture resistance. And if the furniture is also old then it is even less resistant because the adhesives used in the past were not increased moisture resistance. An environment with permanent high humidity or prolonged exposure to water can lead to defects. Sometimes these defects are not radical so the remedy can be done at home. How such furniture reconditioning can be done discover below.
Both chipboard, MDF and solid wood furniture can be veneered
I know, it seems unbelievable that wood veneers wood, but it does. There are situations when this happens. For example, you want oakbut not heavy. Furniture made from poplar wood veneered with technical oak veneer solves the problem. Solid wood furniture is not always the wood you see on the surface.
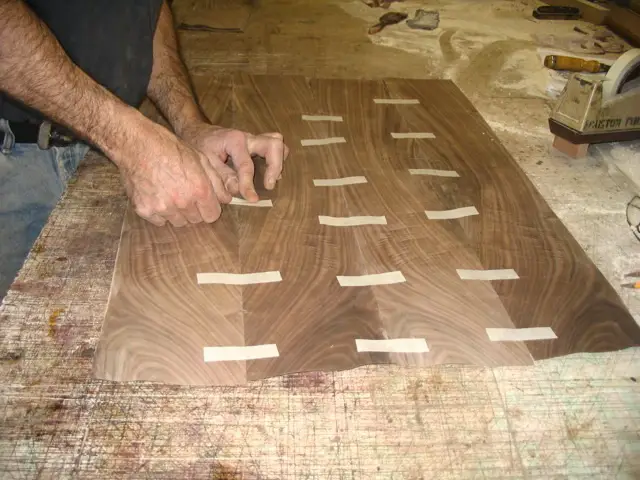
But most often it is veneered chipboard or MDF furniture. Veneering is done in presses with veneer veneers, i.e. less than 1 mm thick. Technical veneers (blind, as they are also called) are thicker (2-3 mm) and are mainly used for solid wood furniture. The veneered panels are then used to make the component parts of the furniture.
When the fault occurs and the main faults that can occur
The main cause of defects is prolonged dampness, but defects can also occur due to knocks. Knocks on old furniture can destroy the adhesive film. If the knock is close to the edge, air and moisture get under the veneer and destroy the glue inside.

Depending on how affected the veneered surface is there are several types of defects. The most important are:
- swelling of the veneer
- veneer peeling on edges
- cracking and tearing of veneer
- total destruction of the veneer
Let's take them one at a time and see how they can be remedied.
1. Swelling of the veneer
It appears where water has been standing for a longer period. It is most noticeable on countertops, but can appear on any surface affected by moisture.
If the swelling is very small you can try to fix it with heat and in most cases the problem is solved. That is, the surface is ironed. This will soften the adhesive and the veneer will stick again.
AttentionNever iron directly on furniture. Put waxed paper first, then a piece of cardboard, on top of which place a cloth that you normally use when ironing. Do not heat the iron to the maximum. After 2-3 minutes pick up the material and check the spot. When the swelling is gone, stop ironing, but leave the paper and cardboard in place until the next day, putting a weight on top.
If the bulge is larger and the veneer is crimped, cut with a fine knife along the length of the defect along the fiber. Carefully insert adhesive through the crack. Press the veneer back into place taking care to match the cut edges. Immediately wipe off excess glue thoroughly. Place waxed paper on top, over which place a weight and leave it overnight.

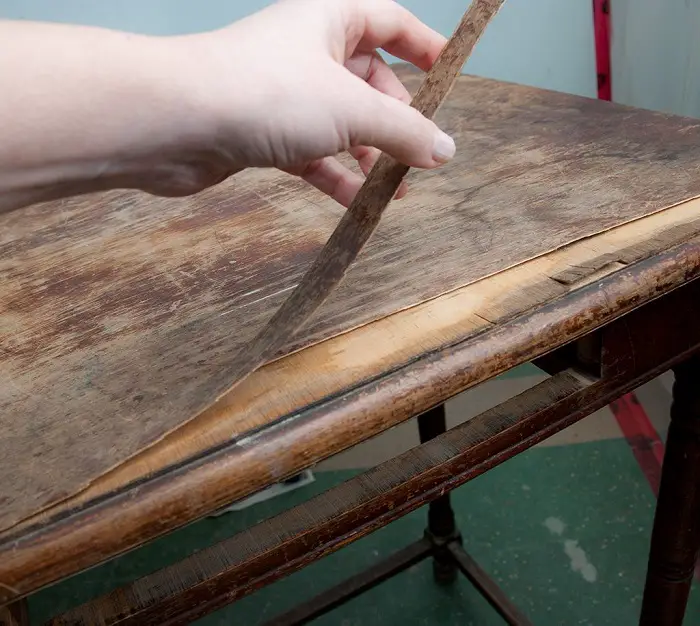
2. Veneer detachment on edges
It happens mostly at corners, bottoms, edges or drawers. If the veneer is loose but whole, carefully clean off the old glue by scraping well with a scraper or thin scraper, then wipe with a cloth, apply glue and press. Wipe off excess adhesive and proceed as above. If it's a clampable edge, use this instead of weight as it is more effective.
If when cleaning the adhesive you see that the peeling is advanced inward, tear off the piece of veneer and clean down to the good adhesive film. Do not cut the veneer because when bonding the contact line will be more visible. Cutting will create a random glue line that will be easier to hide. After cleaning and removing the damaged adhesive, put the adhesive on the clean surface and press the veneer down while putting the broken piece or pieces. Attention how you fit them. Hold tightly until the glue takes hold so that the pieces do not shift. Then clamp, placing a piece of board on top of the waxed paper to press evenly across the glued surface.
3. Cracking and tearing of veneer.
If the veneer is cracked and broken at the edges then the missing pieces need to be replaced. Look for veneer at least as thick as the existing veneer. It will be very difficult to find the same design, but using the same veneer the differences will be small. Remove the old adhesive and check the depth where the unaffected adhesive starts. Carefully cut away the loose veneer with a thin cutter. The cut should be made where the defect-free area begins. Make a paper template of the affected area. You will cut out the added veneer so that it fits snugly over the affected spot.
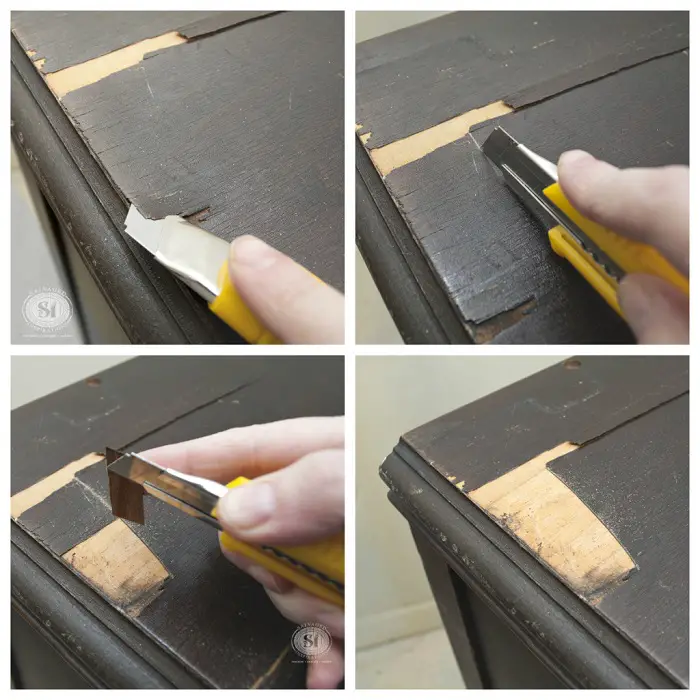
Attention, cutting should be done so that the fiber of the added veneer is in the same direction as the existing veneer. That way, even if there are differences in the design, they will be less noticeable.
Glue the added veneer by holding it tightly until the glue takes hold so that it can't shift. Clamp it as above and leave it until the next day. After removal sand off traces of hardened adhesive and sand to bring level if the added veneer was thicker. Then sand and finish (with varnish or wax).
4. Total destruction of the veneer
But there are situations when veneer is totally compromised. Veneered furniture has cracks all over the surface, there are veneer splits and tears everywhere. In this case the veneer must be completely replaced. If the surface area is large, and the splitting is on the sides of the furniture or in hard-to-reach places, it is a good idea to call in a specialist. But if it's a small table top or drawer front, you can try it yourself. But it's not easy.
a. Total removal of damaged veneer
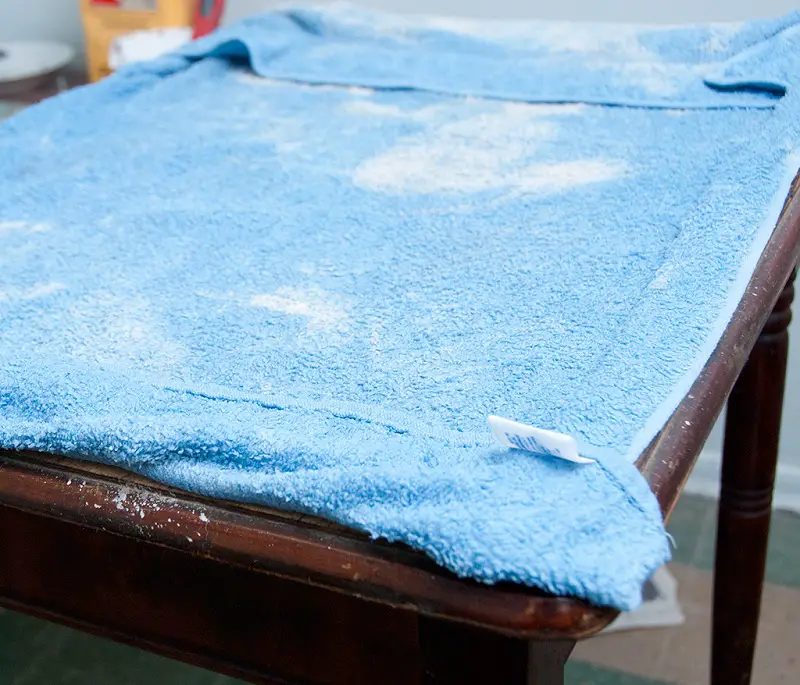
First of all you need to total removal of destroyed veneer. Use a thin spatula and try to loosen the remaining pieces. To make it easier, iron for 2-3 minutes or use a hairdryer to soften the glue.
After you have removed most of the veneer, the remaining traces of adhesive and veneer can be removed by placing a wet towel over the entire surface and leaving for a few hours. When you remove the towel, you will find that the residue has softened and is much easier to remove. Finally wipe the surface thoroughly with solvent.
b. Preparing the veneer and applying it to the cleaned surface
Carefully measure the surface area and buy a larger piece of veneer so that it goes over the edges. If the surface area is larger than a sheet of veneer, glue the sheets together with pieces of adhesive paper. The resulting veneer sheet will be glued to the cleaned surface with the paper side up.
Apply adhesive to both countertop and veneer and carefully place the veneer on the countertop. With a smooth-faced trowel, go over the veneer to remove the air and seat it perfectly. Use an aracet-type adhesive. Protect the veneer as in point 1 and iron with a hot iron (not very hot) to speed up the bonding. Place a piece of wood over the entire surface so that the pressure is evenly distributed and clamp until the next day.
After removing the clamps, carefully cut away the veneer over the edge, sand away the traces of hardened adhesive and the paper with which the veneer was stuck with coarse paper, then sand with 150-180 grit paper to prepare the surface for finishing. Dip and then glaze, oil or wax.
If you have upholstered furniture or if you're a furniture reconditioning enthusiast and want to get your hands on a weathered veneer, I hope these tips will be of use to you. Good luck!


Thank you. An explicit and complete article.
Hello,
I return with a question and to this article. The oak desk has a broken piece of veneer. I found the veneer shell at a hobby shop but it is beech and mahogany. The beech one is closer in shade. I also got a special wood glue. In this case can I still give the desk just wax and varnish or does it necessarily need to be painted because it will be too visible the difference in design and color? I really like the colour and natural look of the oak, especially as this desk is old and gives it an authentic feel.
Thank you!
Hello.
It will be visible mainly because the beech is different in design and structure, the pores are small and arranged differently. If it is not a large piece only the colour difference will be visible. Try to darken the colour a little with tea. Dab the spot with a cloth soaked in tea and let it dry. Repeat if necessary. After complete drying you can apply wax. Wax sits better on wood with a coat of varnish, but you can do it this way. For better protection you can apply oil (linseed oil, Danish oil, tung oil) before the wax. It protects better against moisture. Let it soak for 10-15 minutes and then wipe off the excess. Let dry until the next day and apply wax.
Good luck!
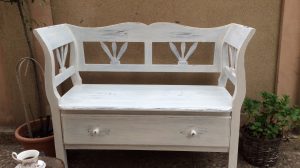
Hello please help me with some advice I have a very old chest of drawers veneered with rosewood and it is in need of reconditioning how can I do it at home? Thank you.
Good evening.
You've given me too little information, but I'll try to manage.
There are 3 variants:
1. The furniture is in good condition, but the gloss of the varnish has been lost. In this case the furniture should be washed with water and detergent, dried thoroughly and left to rust. Afterwards, if the varnish layer is thick enough you can polish it. If not, you will have to sand the varnish lightly with fine abrasive sponges or 320-400 gloss sandpaper and apply a layer of varnish with the desired gloss. I recommend water-based varnishes because they are compatible with almost all varnishes.
2. The lake is scratched. Sand the varnish more vigorously with coarser paper (180-220) to remove the scratched varnish layer. Then apply 2-3 coats of varnish, drying and sanding between coats with fine paper (320-400).
3. Discoloration, veneer stripping, peeling. In this case the lake must be cleaned down to the veneer and the veneer sanded to remove the colour completely. Repairs are done first: the elements are glued, the veneer is glued. Remove any traces of adhesive and sand for a smooth surface. Apply the desired colour of the veneer. Allow to dry and apply the first coat of varnish. Allow to dry and sand for a nice cough. Then apply another 2-3 coats of varnish, depending on how covered you want the veneer to be.
I have told you the options to see what the workload is. It is not easy to recondition a piece of furniture, especially if it is of high quality and this quality is to be preserved.
All the best!
Don't forget to subscribe to the printed Wood Magazine! For only 58 lei/year you can find out news in the field, discover craft ideas or trade secrets. We remind you that the content in the printed magazine is different from the one on the website. Details in the link below.
Thank you!https://revistadinlemn.ro/product/abonament-revista-din-lemn/
Hello,
I would like to paint a piece of furniture that is veneered.
How do you advise me to proceed so that the paint will catch?
Thank you!
Hello!
If the veneer has no finish on top (varnish, primer, paint, filler) you should sand the surface with a medium abrasive sponge or 180 or 220 grit sandpaper. Sanding will ensure even absorption and good adhesion of the paint to the wood. After sanding, sand off and then apply 2 coats of paint, drying and sanding in between. Sanding between coats is done with a fine abrasive sponge or with 280 or 320 grit sandpaper. Sanding between coats increases adhesion and gives a pleasant surface to the touch. I advise you to use a solvent-based paint. Water-based products penetrate deeper into the wood and can damage the glue used to glue the veneer.
If there is an older finish on the surface of the veneer, wash the surface of the furniture with soap and water or dishwashing detergent (with a wet cloth, without using excess water), wipe well and let it rinse. Then sand gently with a fine abrasive sponge, dust and apply paint. Use water-based paint as it is compatible with most finishes. However, check the compatibility of the old finish with the paint on a hidden section beforehand. If they do not separate, do not slide on each other, do not crack or crack, they are compatible.
All the best!
You can also find out more about your favourite topics in printed magazines. You can still subscribe to receive magazines published in 2019 by clicking on the link below.
Thank you!
https://revistadinlemn.ro/product/abonament-2019/
Hello, I have an old piece of furniture, lacquered with serlac. Can a modern lacquer be applied over the serlac or should the old lacquer be removed first? Thanks
Good evening!
Nitrocellulose varnish can be applied. But first the accumulated dirt and traces of wax from cleaning products used over time must be removed. You can clean it with a cloth soaked in water with dishwashing detergent and wrung out thoroughly, then with clean water. Use soft cotton cloths. Finally wipe everything off with the cloth and leave to soak for 24 hours before applying nitrocellulose varnish.
Below is an article on repainting which describes in detail how to clean furniture. I have also put together articles on shellac and how to apply it (French polish), maybe they are helpful.
All the best!
https://revistadinlemn.ro/2020/10/29/ce-trebuie-sa-stii-daca-vrei-sa-revopsesti-mobila-sau-usile-de-lemn/
https://revistadinlemn.ro/2017/08/17/shellac-vechiul-lac-natural-folosit-pentru-protejarea-lemnului/
https://revistadinlemn.ro/2017/08/18/french-polish-metoda-clasica-de-aplicare-a-shellac-ului/
Thank you very much, I'll get the courage and start with a bedside door (on the back).
Good evening, do you have a phone number of a professional in the field of table reconditioning?
Thank you!